English
 Arabic
 French
 Spanish
 Portuguese
 Deutsch
 Turkish
 Dutch
Dutch
 Italiano
 Russian
 Romaian
 Portuguese (Brazil)
 Greek
Greek
Överklaga Bygglov Stockholm – En Komplett Guide för att Överklaga Bygglovsbeslut
Other |
2026-06-22 07:03:42
 Advertise With Us
 About Us
 Terms And Conditions
 Política de privacidade
Ver todos
Política de privacidade
Ver todos

Atualizar para Plus
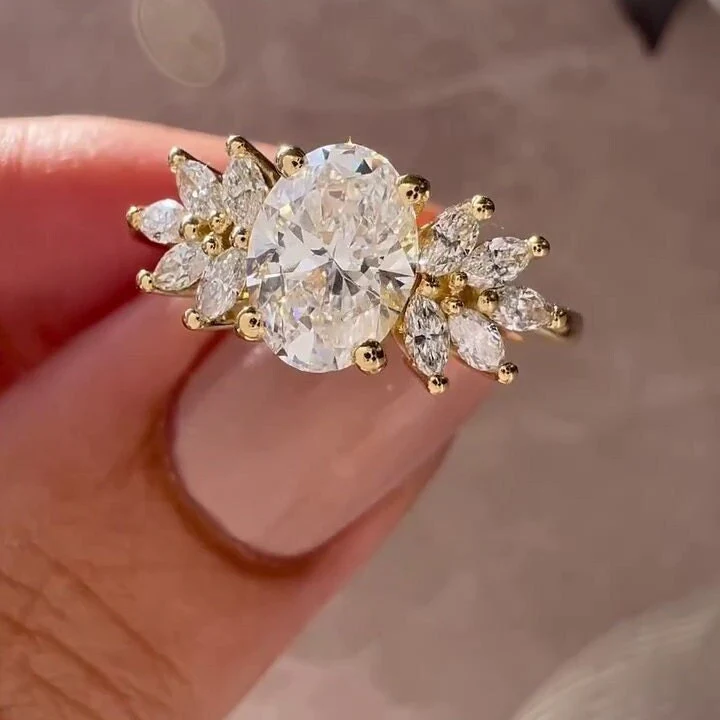
Creating custom lab grown diamond rings begins with more than choosing a diamond and selecting a metal. It starts with an idea, a personal preference, or a detail connected to the person who will wear the ring. That idea may come from a saved photograph, a family ring, a handwritten drawing, or a combination of features taken from several designs. The custom process turns those early references into a ring with carefully planned proportions, practical construction, and personal meaning.
Unlike selecting a ready-made ring, custom design gives the buyer control over the diamond shape, setting height, band width, metal, prong style, side stones, engraving, and many other details. Each decision affects both the appearance and daily wear of the finished piece.
The first step is deciding what the ring should feel like when it is worn. Some buyers already know every detail, while others only have a general direction.
Useful references may include:
References do not need to show one perfect ring. A buyer may prefer the band from one design, the basket from another, and the prongs from a third. These elements can be discussed and combined into a more personal concept.
It is equally helpful to identify unwanted features. A buyer may dislike raised settings, thick bands, exposed galleries, sharp prongs, or stones placed too close together. Knowing what should be avoided helps narrow the direction before sketching begins.
Before focusing on visual details, the jeweller needs to understand how the ring will be used. A ring worn every day requires different planning from one reserved for selected events.
Daily routine can influence several design decisions. Someone who works with their hands may benefit from a lower setting and secure prongs. A person who regularly wears gloves may prefer a smooth profile with fewer raised details. Someone planning to pair the ring with a wedding band should consider how the two rings will sit together.
This stage also covers lifestyle questions such as:
These practical questions prevent a design from being judged only by appearance.
Custom work can be planned around different budgets, but the budget should be discussed before the design becomes too detailed. This allows the jeweller to recommend the right balance between the diamond, metal, setting, and additional stones.
The centre diamond usually represents the largest portion of the total cost. Adjusting carat weight, colour grade, clarity, or shape can create more room for design features without exceeding the planned amount.
For example, a slightly lower clarity grade that remains visually clean may allow the buyer to choose a larger face-up size. A narrower pavé band may cost less than a wide band with several rows of stones. A simple hidden halo may add detail without requiring large side diamonds.
When planning custom lab grown diamond engagement rings, it is useful to divide the budget into three areas:
This approach helps buyers see where adjustments can be made without changing the entire concept.
The centre stone strongly influences the proportions of the ring. Its shape, dimensions, depth, and length-to-width ratio determine how the setting should be developed.
Two diamonds with the same carat weight may look noticeably different when viewed from above. One may carry more weight in its depth, while another may provide broader finger coverage. For this reason, measurements should be reviewed alongside carat weight.
Round, oval, pear, emerald, radiant, cushion, marquise, and Asscher shapes each require different structural planning. Elongated stones may need extra support at their tips. Step-cut diamonds often benefit from cleaner setting lines. Soft-cornered shapes may suit rounded prongs, while pointed shapes usually require protective tips.
A custom design should be developed around the exact diamond whenever possible. This allows the basket, prong placement, halo spacing, and band connection to match the stone’s real measurements.
Once the main requirements are clear, the first sketch gives the idea a visible form. This drawing may be completed by hand or through digital design software.
The first sketch usually focuses on the overall direction rather than tiny production details. It may show:
The sketch is a discussion tool. Buyers should review it carefully and comment on anything that feels incorrect. A band may appear wider than expected, the centre stone may sit too high, or the side stones may draw too much attention.
Changes are easier to make at this stage than after production begins. Clear feedback helps the designer revise the idea without misunderstanding.
After the first sketch is approved in principle, the ring’s proportions need closer attention. Small measurements can have a major effect on how the ring looks and feels.
Band width is one example. A very thin band can make a centre diamond appear larger, but it must still provide enough support. A wider band may feel more secure, although it can change the balance of the design.
Setting height also matters. A high setting may create space for a straight wedding band, while a lower setting may feel more comfortable during daily wear. The right choice depends on the wearer’s routine and preferred profile.
Other structural details include:
This is where a beautiful idea is turned into a ring that can be worn with confidence.
Many jewellers create a computer model after the sketch has been refined. This model shows the ring from multiple angles and provides a clearer view of its construction.
A digital model can help the buyer understand features that may be difficult to picture from a flat drawing. These may include the height of the centre stone, the curve of the band, the shape of the basket, and the way side stones connect to the setting.
However, digital images should be viewed as technical previews rather than exact photographs of the finished ring. Metal thickness, surface finish, stone reflections, and fine details may appear different after production and hand finishing.
During this stage, buyers should check:
Approval should only be given after these points have been reviewed.
Personal details are one of the main reasons buyers choose a custom ring. These additions may be visible or hidden.
Common options include initials, dates, short phrases, birthstones, engraved symbols, hidden gemstones, floral patterns, or details inspired by architecture. Some couples include a private message inside the band, while others use a meaningful stone beneath the centre diamond.
These features should be selected carefully. Too many additions can compete with the main design, especially on a smaller ring. One or two thoughtful details often have more impact than several unrelated elements.
A buyer looking to customize lab grown diamond ring details should also consider long-term practicality. Deep engraving may be easier to maintain than extremely fine lines. Hidden stones should be placed where they remain protected. Raised motifs should not create discomfort between the fingers.
Before production starts, the complete design should be confirmed in writing. This final approval may include the diamond certificate, metal type, ring size, stone dimensions, band width, setting style, engraving, side stones, and finishing preference.
This is also the time to confirm whether the ring will have a polished, matte, brushed, or mixed surface.
Buyers should avoid assuming that a detail is understood simply because it appeared in an inspiration photo. Every important feature should be listed clearly. Written confirmation protects both the buyer and the jeweller from confusion.
For custom made diamond engagement rings, the approval stage acts as the final checkpoint. Once the ring enters production, structural changes may require additional time, labour, or cost.
After approval, the ring moves into production. Depending on the method used, the design may be prepared through casting, hand assembly, or a combination of techniques.
During casting, the ring form is created in the selected metal. The raw casting then needs cleaning, shaping, and inspection. Separate parts may be joined, and areas that hold stones are prepared for setting.
At this stage, the ring does not yet have its final surface. Tool marks, unfinished edges, and extra metal may still be visible. Bench work is required to refine the shape and prepare each setting area.
Good production depends on accurate measurements from the earlier design stages. The closer the model matches the exact diamond and ring size, the fewer adjustments are needed during assembly.
Stone setting is one of the most precise parts of the process. The setter secures the centre diamond and any side stones while keeping the layout balanced.
Prongs must hold the stone firmly without covering too much of its surface. Pavé stones need consistent spacing and alignment. Halos should follow the outline of the centre diamond without looking uneven. Bezel edges should appear smooth and balanced.
The setter also checks that pointed stones are protected and that no stone moves within its setting. Even a small alignment issue can affect the final result.
Buyers who build your own engagement ring lab diamond design should remember that the setting style affects maintenance. Fine pavé may require more care than a plain band. Tall prongs should be inspected periodically. Bezel settings provide more edge protection but create a different visual profile.
Once all stones are secured, the ring receives its final finishing. The metal is polished or textured according to the approved preference. Edges are smoothed, engraving is completed, and the setting is cleaned.
The ring should then go through a detailed inspection. The jeweller checks:
The ring may also be cleaned under magnification so that any residue from production is removed.
This inspection is important because the buyer sees the finished piece, not the many technical stages behind it.
When the ring arrives, it should be reviewed in natural light and indoor light. The buyer should check the fit, centre-stone position, engraving, band comfort, and overall proportions.
A new ring may feel different from jewellery worn in the past, particularly if it has a wider band or raised setting. However, it should not have sharp edges, loose stones, or uncomfortable prongs.
Care instructions should also be provided. Regular cleaning, professional checks, and sensible storage can help protect both the diamond and setting.
Those comparing custom lab diamond rings can benefit from reviewing completed examples before starting their own design. Explore Collection of custom lab grown diamond rings to study how different stone shapes, profiles, bands, and settings work together before deciding which details suit your preferences.
The success of a custom ring depends heavily on communication. Buyers do not need technical jewellery knowledge, but they should describe their preferences clearly and ask questions whenever something is unclear.
Rather than saying, “Make it delicate,” it may be more useful to specify a preferred band width. Instead of asking for a low setting, the buyer can explain that the ring must fit under gloves or sit beside a straight wedding band.
Visual references, measurements, written notes, and direct feedback all reduce uncertainty.
Brands such as Antiquecut may offer custom options, but the buyer still plays an active role by reviewing each stage and confirming that the design reflects the original idea.
The path from first sketch to final ring involves many connected decisions. The centre diamond affects the setting. The setting affects the band. The band affects comfort, durability, and how another ring may sit beside it.
A successful custom lab grown diamond ring is not simply a collection of preferred details. It is a balanced design in which every element supports the next. Taking time during the planning, sketching, modelling, approval, and inspection stages can prevent rushed choices and create a ring suited to the person who will wear it.
The custom process gives buyers the opportunity to think beyond standard combinations. With clear references, practical planning, careful proportions, and consistent communication, an early idea can become a finished ring that feels personal from every angle